Same as our face, our hair is exposed to harsh elements every single day, yet hair masking is something “extra” that we do for our hair, even though consistent hair masking for hair that was dyed, chemically treated or regularly blowdried is a must. Whether you pursue hair oiling, DIY or store-bought solutions is up to you, here we aim to provide a brief guidance and summary what a hair mask is, what it isn’t and how to apply it to derive most benefits.
There are two categories of hair masks: those applied on the hair length – conditioning, repair and nourishment type. And those applied on scalp – usually these are targeting hair growth or oiliness. Let’s take a closer look of the two.
Hair length masks
In a very rough summary, these masks promise to repair split ends, which is why they are applied on the lengths of the hair. However, repair does not equal restore the hair structure, which is where majority of people get their expectations wrong.
Below is an image of various ways your hair may be damaged:

Split hair ends, otherwise scientifically known as “trichoptilosis” (rom the Greek τριχο- tricho- “hair” and the New Latin ptilosis “arrangement of feathers in definite areas” from the Greek πτίλον ptilon “feather”). It doesn’t necessarily have to occur at the end of the hair – though it is most common, sometimes, especially in chemically or heat-treated hair a split can occur in the middle of the hair shaft. While there is a number of different reasons why split ends occur, today we look at the mechanics of hair repair masks.
Hair repair masks fill the gaps in the broken hair structure, acting like a temporary glue. Although it slows down further breakage along the length of the hair temporarily, these polymer molecules need to be replenished in order to maintain the bond. Which is why you have to continuously reapply repair masks on a regular basis (there is a cheat down the bottom of this article!).
A word of consideration: a lot of masks contain silicones, which is what gives the hair its shine after a mask application, however it is also what suffocates the hair strand, too.

Best time to apply:
The best time to apply repair hair masks is after washing, while the hair is still wet, because if you follow up this type of hair mask with the shampoo, it will wash off polymer molecules rendering your masking effort futile.
A word on hair porosity
Another consideration is hair porosity. For high porosity hair, you just need to add a seal at the end of the wash – apple cider vinegar (ACV) rinse or simple cold water rinse would do. For low porosity hair, in order for the mask to penetrate the hair shaft you need to ensure that that hair cuticles are properly open. A procedure for low porosity hair is as follows:
- Rinse off the shampoo with warm (not hot!) water
- Squeeze the excess water out
- Apply the mask
- Put on a shower cap
- Put on a warm towel or beanie hat for the duration of the mask application
- Rinse off the mask with warm water
- Seal off with cold water or ACV rinse
For high porosity hair you can follow the same steps: because hair cuticles are already open – step 5 isn’t as necessary.
Scalp masks
There is another type of hair masks, less common but very much overlooked – scalp masks.
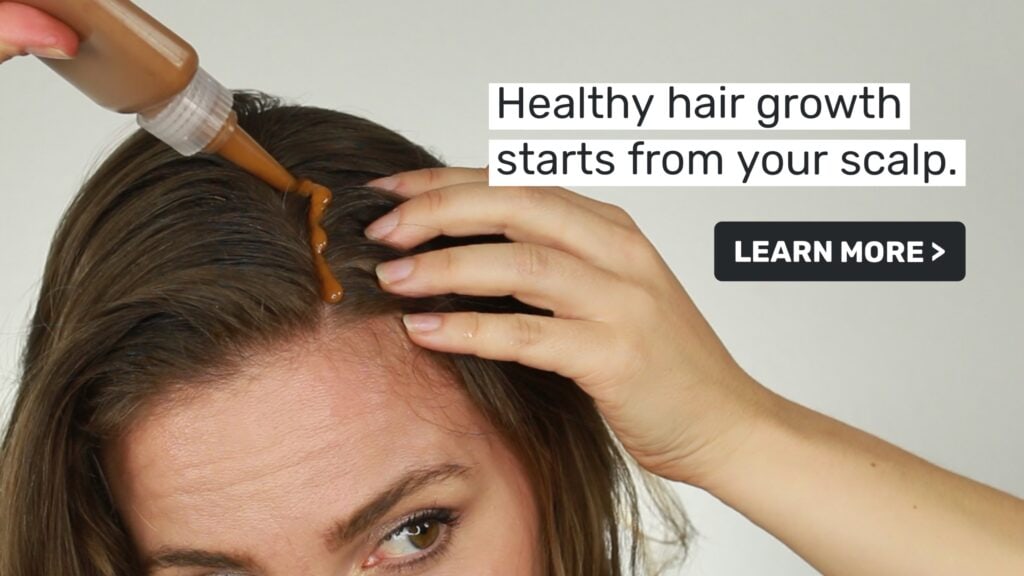
Those are the masks that actually help with hair growth and regulation of the oiliness of your hair. Because the ingredients from these masks need to come to close contact with your hair follicle – the exact place where your hair grows from (hint: it’s not the lengths!), or where the sebum (natural hair oil) is produced. Which is why The Hair Fuel growth mask needs to be applied only on the roots of your hair and not the entire length, click below to find out more about how it works.
Best time to apply:
The way to apply scalp masks is before washing your hair – and to maximise the benefits leave it for 30-60 minutes, especially those masks made from fresh ingredients. While it should be logical that a DIY egg + honey mask, needs to be washed off – it’s always better to clarify!
- Apply scalp mask on the roots of your hair
- Put on a shower cap
- Put on warm towel or beanie hat for the duration of the mask application
- After required time lapsed, thoroughly wash the mask out with shampoo following up with a conditioner (or you can now do a hair length mask!)
- Seal hair lengths off with cold water or ACV rinse
DIY hair masks
Do-it-yourself masks are usually made up of ingredients that you could eat: egg, banana, avocado, honey – so you would need to wash it off after application with a shampoo and a conditioner. However unlike scalp masks – DIY masks can be applied on the lengths and the roots of your hair as they can nourish both areas without putting extra weight or increasing hair oiliness, like store-both deep conditioning masks would tend to do. Follow the steps for scalp masks outlined above, ensuring you wash it out properly after you’re done.
Seasonal considerations
There are seasonal considerations at play: during winter our hair becomes more brittle due to constantly changing temperature and physical damage to the strands due to rubbing against scarves, coats and hats. So our hair would need extra care and TLC, while in summer time we need to consider sun damage. Throughout the year, if you’re a bearer of long hair, protective hairstyles coupled with silk pillowcase is by far the low effort – high return thing you can do to your hair.
Finally, we promised a cheat for treating split ends.
While there isn’t such a thing as “repairing split ends” as we described above, the only way to repair is to trim it off. If you’re looking to maintain your lengh – search & destroy technique might be the best option for your out there. Search & destroy involves cutting off your split ends individually rather than removing entire length at once.
Who we are:
The Hair Fuel is an all-natural hair growth mask created by Laura Sagen, who lost a third of her hair after a terrible visit to a hairdresser while suffering from a life-long condition of PCOS associated with androgenic hair thinning. She developed the formulation rooted in the science of scalp blood flow, which has become The Hair Fuel growth mask. Since then, her company has helped thousands of people like you to start growing healthy hair.
We work closely with our lab and manufacturers to ensure the highest quality product. But a product alone is never enough – so we hold your hand throughout your own, unique hair growth journey. Our flagship product, The Hair Fuel mask coupled with tailored advice, digital tools, and online support is there to help you grow the best hair you can. It’s a big claim – but we’re unafraid to make it. Check out our starter bundles >>
Sources:
Vegetable protein in masks: (1)
Central trichoptilosis associated with trichorrhexis nods and pili torti (2)